If only we could turn all of our veggies into cake

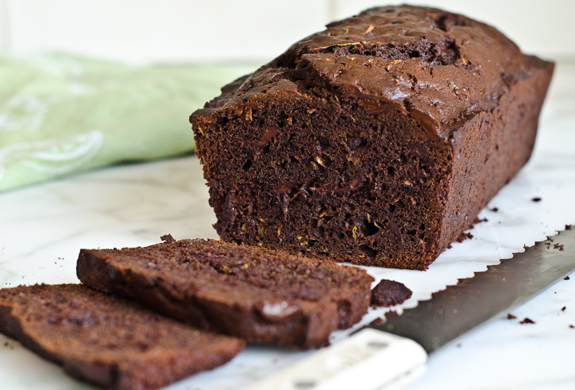
So after a weekend beach trip that led to a last minute pit stop at a Delaware farm stand, I somehow ended up with a refrigerator full of zucchini. For a week I had it baked, broiled, roasted, toasted, and caked, and I somehow still had some of this veggie left. Before I threw in the towel and forced the food upon my roommates, I realized that despite my weeklong zucchini fest, I still forgot to make my favorite recipe with it: zucchini bread. For those of you who now think I’m crazy, it’s kind of the same concept as banana bread, except you don’t really taste it. It just turns out into this moist yummy breakfasty bread that you will gobble up. Because seriously, this stuff is amazing. Chocolate is theoretically optional in this recipe (and its actually quite good without any chocolate), but who sees chocolate as optional??

Enjoy!

xo SA

Chocolate Zucchini Bread
Cook Time: 20 Minutes
Total Time: 1 Hour 20 Minutes

Ingredients

  • 1 stick (1/2 cup) unsalted butter
  • 3/4 cup plus 2 tablespoons light brown sugar, packed
  • 2 large eggs
  • 1 teaspoon vanilla extract
  • 1-2/3 cups all purpose flour, spooned into measuring cup and leveled off with a knife
  • 1/3 cup Dutch-process cocoa powder (do not substitute natural cocoa powder)
  • 3/4 teaspoon salt
  • 1/2 teaspoon baking powder
  • 1/2 teaspoon baking soda
  • 1/2 teaspoon espresso powder or instant coffee (optional)
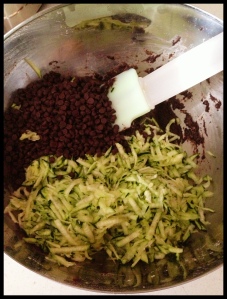
  • 2 cups shredded zucchini (from 1-2 zucchini), gently packed
  • 1 cup semi-sweet chocolate chips

Instructions

  1. Preheat the oven to 350 degrees and grease an 8-1/2″ x 4-1/2″ loaf pan with nonstick cooking spray.
  2. Place the butter in a large microwave-safe mixing bowl and microwave for one minute, or until just melted. Stir in the brown sugar until completely smooth. Add the eggs and vanilla and stir until incorporated. (Be sure to add the eggs after the brown sugar is mixed in, as the hot butter alone could cook the eggs.)
  3. Whisk together the flour, cocoa powder, salt, baking powder and baking soda in a medium bowl. Add to the butter mixture and stir until well combined. It will be very thick.
  4. Stir in the shredded zucchini and chocolate chips. (It will still be thick — that’s okay.)
  5. Spoon the batter into the prepared loaf pan and spread evenly. Bake for 60-65 minutes, or until a toothpick or cake tester inserted into the center comes out clean (save for perhaps a smear from the melted chocolate chips). Let the loaf cool on a rack for about 10 minutes before turning out onto a rack to cool completely.

IMG_1323chocolate-zucchini-bread1

credit

“Pesto is the quiche of the ’80s”

One of the better parts about the weather being warm is the fact that I can actually grow plants outside without having to worry about my kitchen being cluttered up. You can see my roommate’s bamboo collection as well, but I think my favorite plant to grow though has to be my basil. Its versatile in cooking, re-growns pretty fast, and as long as you frequently water it, it’s pretty tough to kill. And of course, my first dish with said basil has to be pesto.

photo

There are lots of varieties of pesto, so you really have to edit it to your liking. I don’t use actual recipes, but rather go in the mood for what I’m looking for that day. Generally speaking, my pesto includes:

-LOTS of Basil. Practically an entire plant, actually.
-Parmesan cheese (Romano can be mixed in as well)
-Olive Oil
-Salt & Pepper
-Fresh Garlic
-Pignoli Nuts
-Optional: Spinach, raw onion

Now, what do I use it for?

creamy pesto pasta

TomatoBruschettaHERO2

Bruschetta and pasta are probably two of the easiest recipes with pesto, but you can also make it with chicken, sandwiches, butter… I could go on, but I shall refer you to this link if you ever ever run out of ideas..

Happy Cooking!

xo SA

Courtesy of the Red, White, Blue, and CHOCOLATE PIE!

So of course, one fabulous part of any holiday is the yummy things that are eaten when people gather. Something that should be dually noted here is that every member of my family is born on a holiday. Yes, every member. Really. Thus, on this wonderful 4th of July, we also are celebrating a family birthday, complete with birthday-esque desserts! My little sister found this AMAZING recipe a few months back, and was shocking nice enough to save a piece for me when I was visiting. To say its a winner is an understatement. When I found out she was making it again for the holiday, well…lets just say all my coworkers and friends now know about this amazing peanut butter pie. It’s yummy and filling, but also chilled, so it really can be used any time of the year and its appropriate. And lets be honest, you can’t go wrong with peanut butter and chocolate in any capacity.

It looks a little something like this, and because I’m not a horribly selfish person, I shall provide you with a similar recipe based off of what my sissy has told me she used.

WU0313H_chocolate-peanut-butter-pie-recipe

Crust:
25 Oreos
4 Tbs butter, melted.

Filling:
1 Cup creamy peanut butter (Jif is what I like)
1 8 Oz package of cream cheese
1 1/4 Cups powdered sugar
1 8 oz serving of Cool Whip, thawed. (you can use other brand but why)
Shaved chocolate or Chopped peanut butter cups for garnish!

Crush the Oreos until they are fine crumbs.
Pour the melted butter over the top and stir with a fork to combine.
Press mixture into a pie pan, then bake in a heated oven for 5 to 7 minutes until firm.
Remove and cool.

Filling:
Beat the peanut butter with the cream cheese until smooth.
Add powdered sugar and stir until combined and creamy.
Add Thawed Cool Whip and beat until blended and smooth.
Pour filling into cooled pie crust, add shaved chocolate and or chopped peanut butter cups for garnish and chill for a few hours.

And then die of happiness.

You know what I also love about the 4th of July?

Tequila-soaked watermelon.’Murica!

tequila-watermelon

And before I sign off for the fabulousness that is our Independence Day and the fantastic festivities that shall ensue because of it, I would like to wish an especially Happy 4th to my lovely co-auth who is celebrating her first 4th of July as a full-fledged passport-carrying American! Wooohoo!

Happy Independence Day, all 🙂

xo SA

Hello friends!

So I know we have been MIA recently (life just has a tendency of getting in the way) but don’t you worry, we are back in action!

I just have a brief thought for you now but we have some awesome and serious articles coming up within the next few weeks. With all this political action, obviously we have some opinions that need to be aired!

But here’s what I got today: Sandwich art! It seems to be a new trend taking over kids’ lunch boxes (well sorta, taking into account people who actually make their kid’s lunches and actually do this) but regardless. There is a Pinterest page, recipes and ideas all over parenting magazines and kids magazines and it even had mini debut on the Dr. Oz show.

20130628-104012.jpg

Although I think it’s adorable and the whole idea of decorative foods is a billion dollar industry (um charm city cakes? Cupcake wars? Challenge? Food network?!?) and we all do attempt it to some degree.. Is this ridiculous? Even worth it?

What do you think? I like it but I think I would be totally heartbroken if I worked so hard on something and it was gone in a few seconds but then again in today’s social media world I am sure it would never “really” be gone!

Let me know what you think!

Toodles,

ac

I am nutty and I know it….

Today I busted out an old favorite my mom always makes. This mixture is perfect for a lazy Sunday afternoon, a 3 o’clock pick me up, or even can be accompanied by a cold beer. The best part is you can use a variety of nuts and ingredients to suit your taste.

The one I made today was from a box of unsalted nuts that was sitting the in pantry. The combo has cashews, pecans, pistachios, and almonds.

To start, throw whatever combo of nuts you want in a pan on low heat on the stove. Then season with some salt, pepper, turmeric, and cayenne pepper. My mom also uses a little pomegranate powder to give it a little citic/lime/lemon-y taste. When in doubt, cook like an Indian: there is no measurements, just take a guess and taste it; if you don’t like it, add a little more.

Image

Image

Let the nuts warm up slightly and stir them around in the seasoning. Once warm, take off the heat and enjoy. You can eat them warm right away or let them cool and save them for later. The best part of this recipe is that it is healthy and is so easy to make it your own. As you can see I even threw in some chia seeds in mine and paired it with a green smoothie to make it a healthy alternative to nibble on.

Image

What do you think? What nuts/spices would you use?

toodles,

AC